Combine head geometry
When creating characters in Blender, you must combine the head geometry to a single object.
Whenever you are ready to export your model, it's important to clean up your project to ensure that your model is ready to export. This includes the following tasks that ensure the customized template model and all of the avatar components can import into Studio successfully:
- Combining extra head geometry
- Removing extra head bones
- Verifying attachment points
- Final technical checks
Failure to combine head geometry and remove head bones will cause issues with validation, as the character will no longer adhere to the expected standard geometry and joint hierarchy.
Combine head geometry#
At this point, you should also combine the separate head and face objects within the single Head_Geo object. Some templates don't include some face objects, like lashes. To combine the head and face meshes:
In the Outliner, hold Ctrl/⌘ and click the following objects, ending with the
Head_Geo:UpperTeeth_GeoLowerTeeth_GeoTongue_GeoRightLash_GeoRightEye_GeoLeftLash_GeoLeftEye_GeoHead_Geo
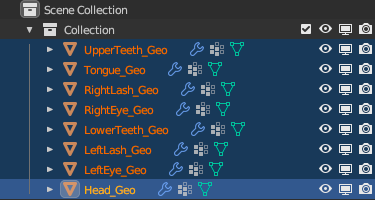
When selecting multiple head objects, make sure that the Head_Geo is highlighted as yellow, indicating it as the main object that the others merge into. This correctly preserves the custom properties stored in the head mesh. You can achieve this by selecting the head last in the Outliner.
While in Object mode, right-click in the viewport and select Join from the contextual menu. The objects combine as a single
Head_Geoobject.