Script Editor
Roblox's built-in, fully-featured script editor includes modern conveniences like autocomplete, code highlighting, and multi-cursor editing.
The Script Editor in Studio is the primary tool for scripting on Roblox. It's a self-improving environment that can help you write high-impact code, shorten your development time, and iterate on your games. It can improve your scripting experience by:
- Formatting and highlighting syntax in your code.
- Offering ways to autocomplete phrases in your code as you type.
- Helping you navigate code by jumping to variable and function declarations.
- Helping you find and replace code in open scripts or all scripts.
- Providing real-time feedback on your code quality and performance.
The Script Editor supports all types of scripts and opens automatically when you create a new script or double-click an existing script in the Explorer window.
You can customize the Script Editor to suit your preferences and workflows, including font family/size, formatting behavior, and colors for syntax highlighting. You can also toggle features such as autocomplete, and script analysis.
Autocomplete features#
The Script Editor's autocomplete features generate code-related information that can improve your programming efficiency, such as:
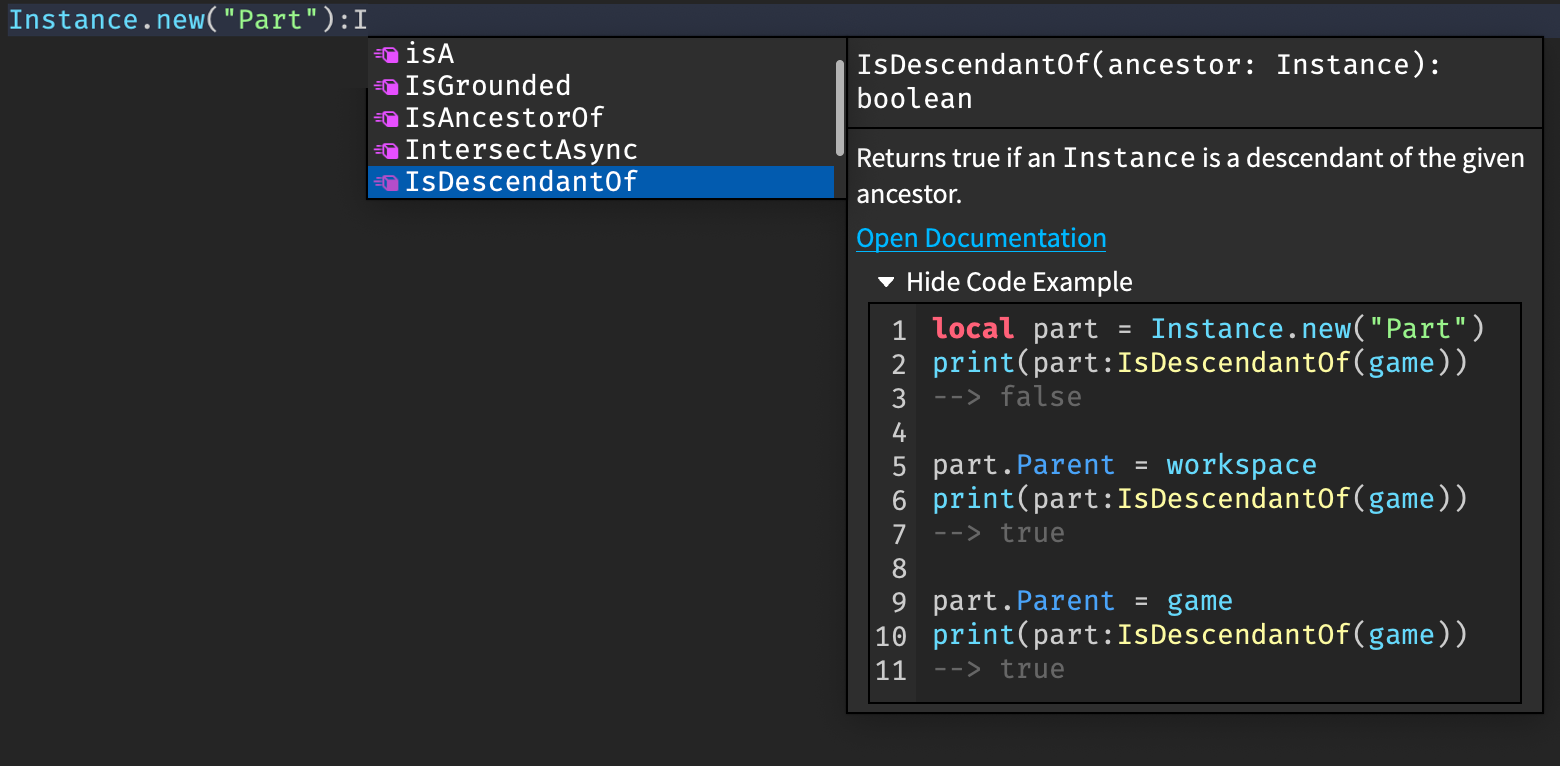
Informed suggestions on how to complete phrases as you type them that are contextual to the game's data model. For example, if you have a
ModelinWorkspacecalled RocketShip, autocomplete suggestsRocketShipwhen you typeworkspace.rocand indicates that it's aModel.
Use the ↑ and ↓ keys to browse the suggestions, then press Tab or Enter to accept a suggestion and insert the complete phrase.
Autofill names for variables and functions that you declare, helping you avoid pesky typos.

Documentation pop-ups with code samples that are similar to those on the Engine API Reference, giving you context on the API's usage.
On-hover tooltips that you can customize with your own defined documentation. Place a block comment immediately before a function, variable, or other declaration, and the Script Editor shows that comment as a tooltip when you hover over the name later. This also works when the declaration appears inside a type expression, such as
typeof():export type Icon = { new: typeof(--[[Constructs an empty icon.]] function(): Icon return (nil :: any) :: Icon end), }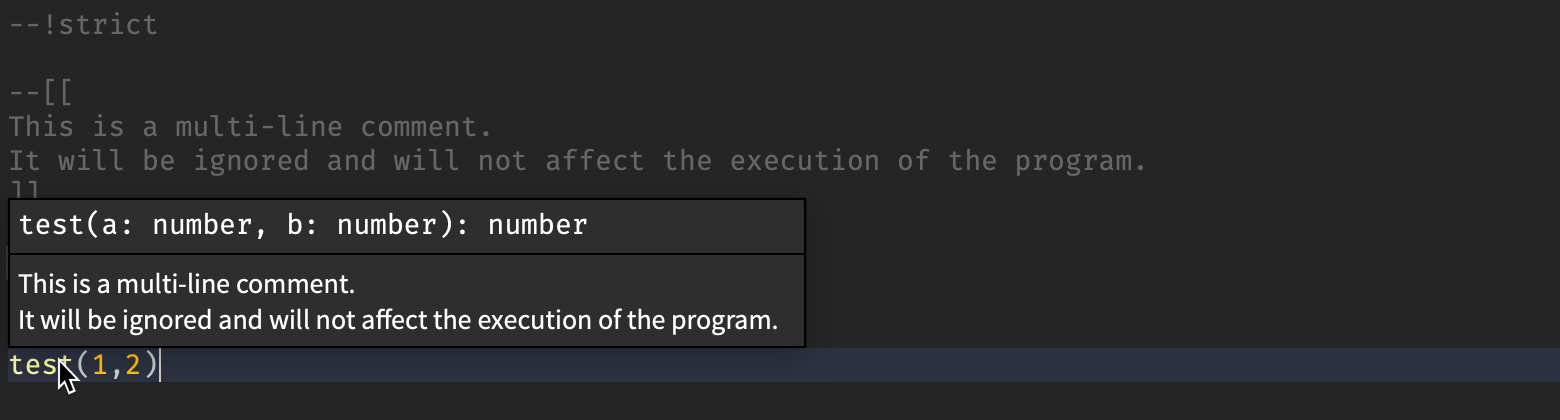
On-hover script analysis diagnostics with information you can use to troubleshoot errors.

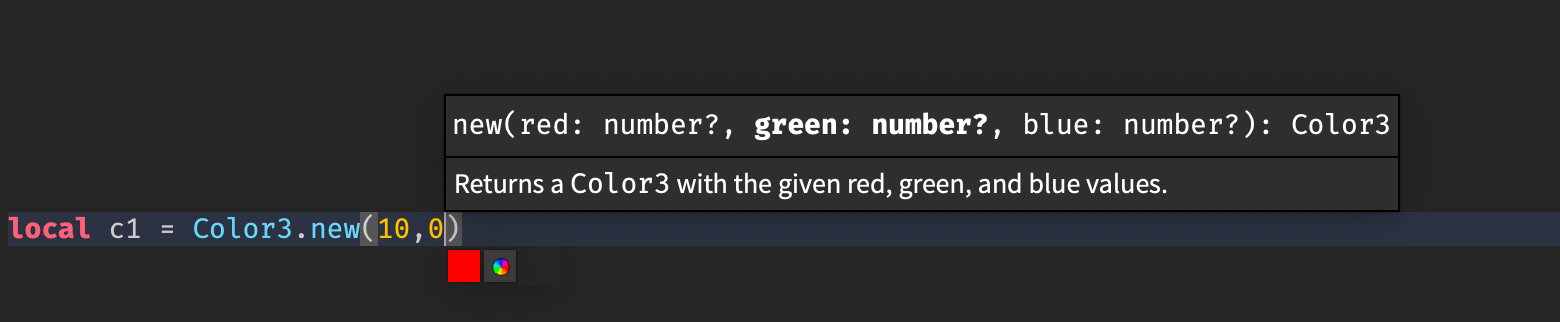
Function signatures when you type an argument, providing you a reference for its parameters and return values.
Code navigation#
Go to declaration#
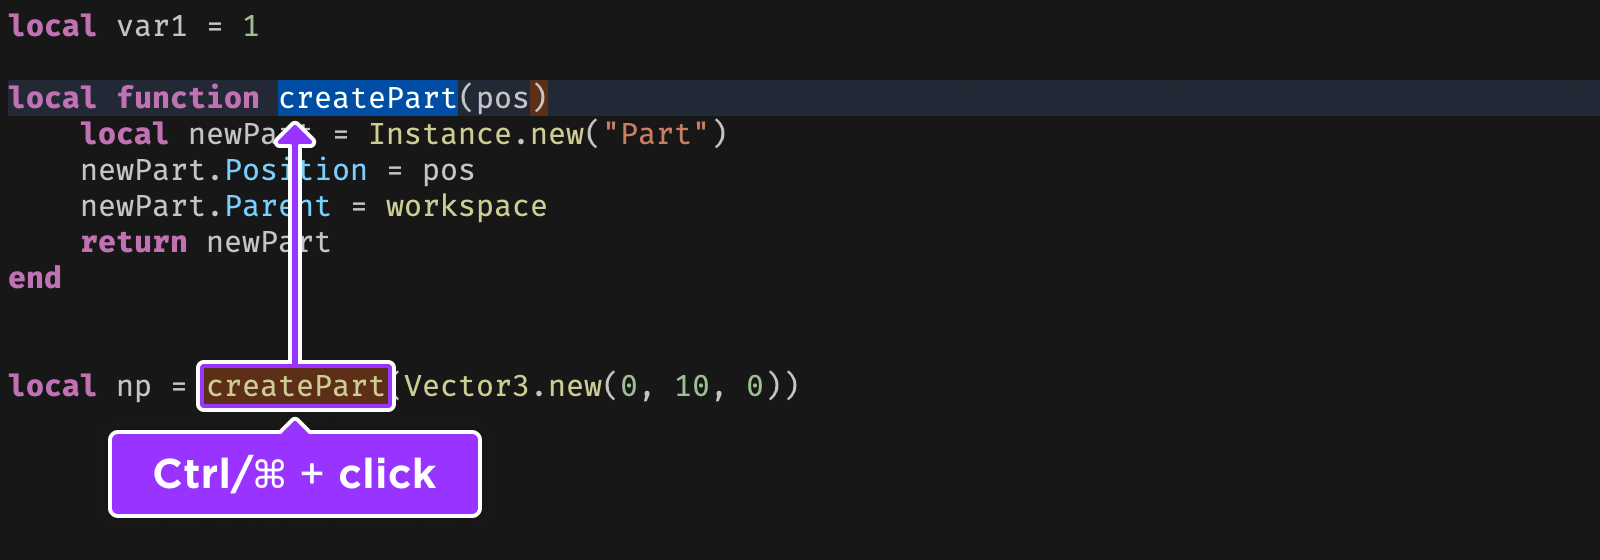
You can jump to the declaration of a function or variable by holding Ctrl on Windows or ⌘ on Mac when clicking the call, or by right-clicking its call and clicking Go to Declaration.
Script function filter#
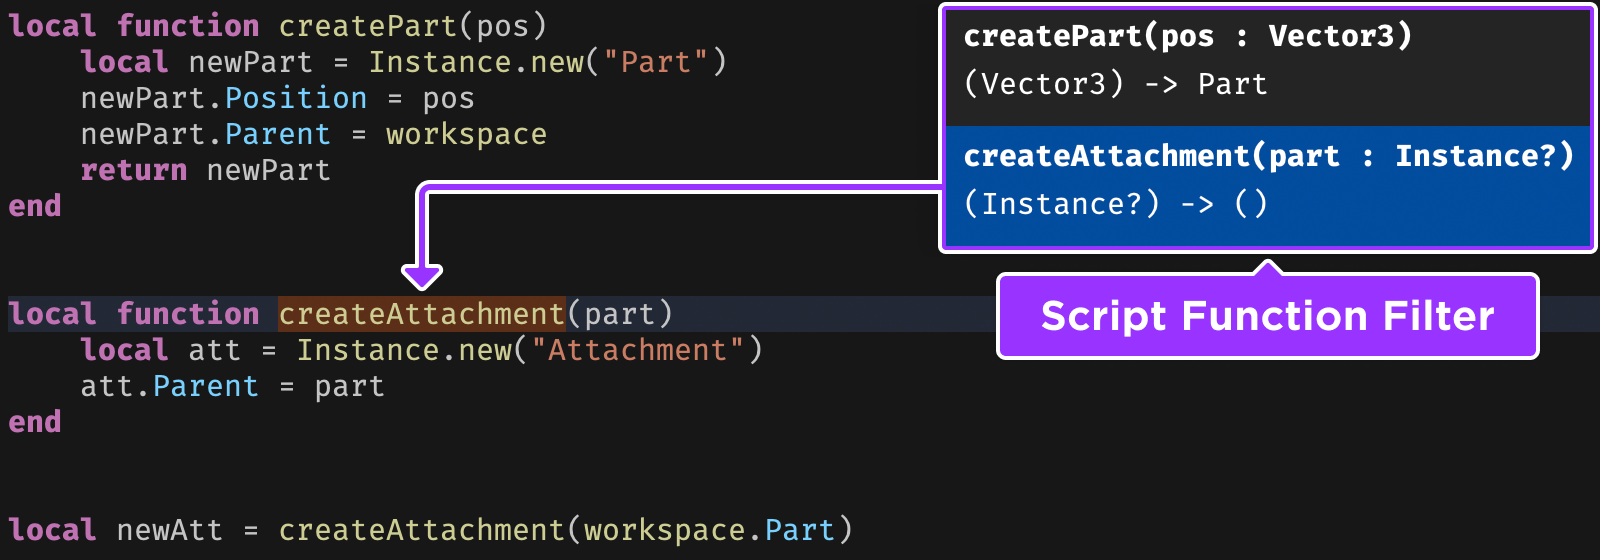
The Script Function Filter displays a list of all functions declared in a script. To open it, press AltF on Windows or ⌥F on Mac. With the list open, you can browse the signatures for each function, filter through them by name, and double-click one to jump to its declaration.
Find and replace#
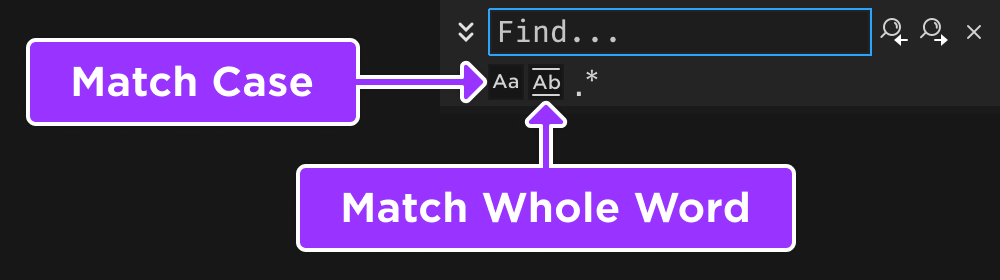
The Find/Replace widget lets you find and replace code in an open script. The widget supports matching case, matching the whole word, and searching by regular expressions. To open it, press CtrlF on Windows or ⌘F on Mac.
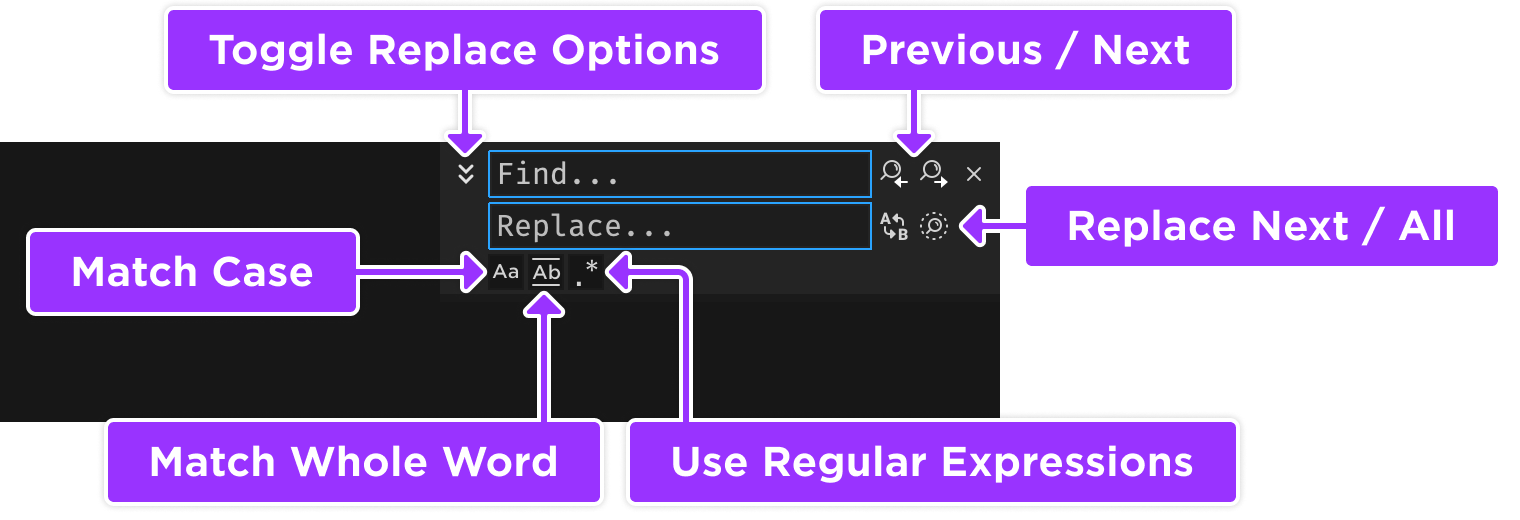
For broader searches, the Find All / Replace All window lets you find/replace code across multiple scripts in the game. To open it, press CtrlShiftF on Windows or ⌘ShiftF on Mac.
Real-time feedback#
Script Analysis#
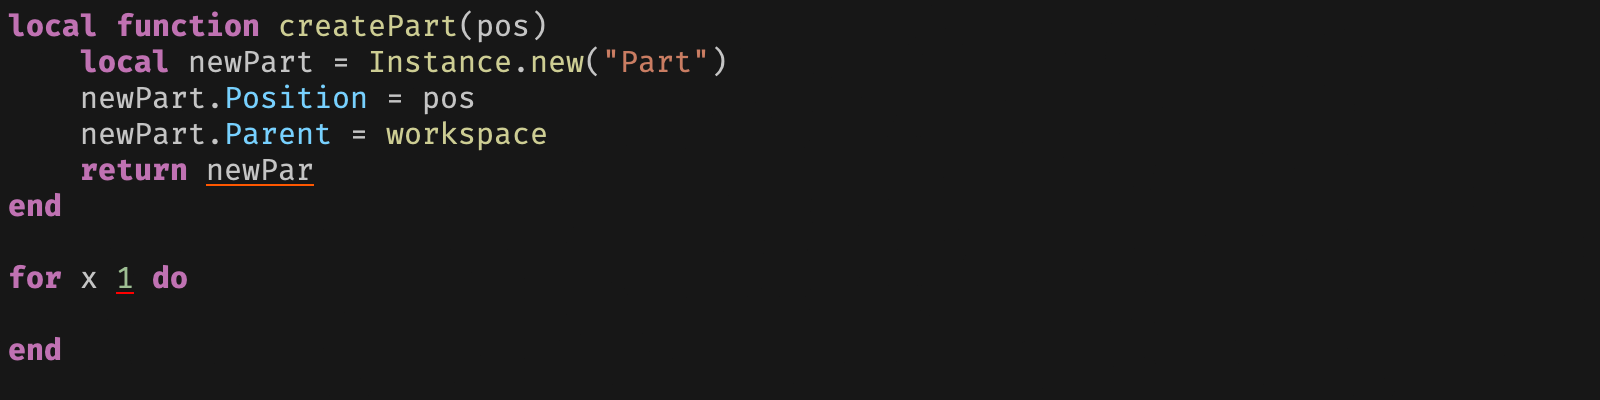
The Script Analysis window, accessible through the Analysis button in Studio's Script tab toolbar, performs static analysis on your scripts and displays active errors and warnings. For more information on the errors and warnings, see the Luau linting documentation.

Output#
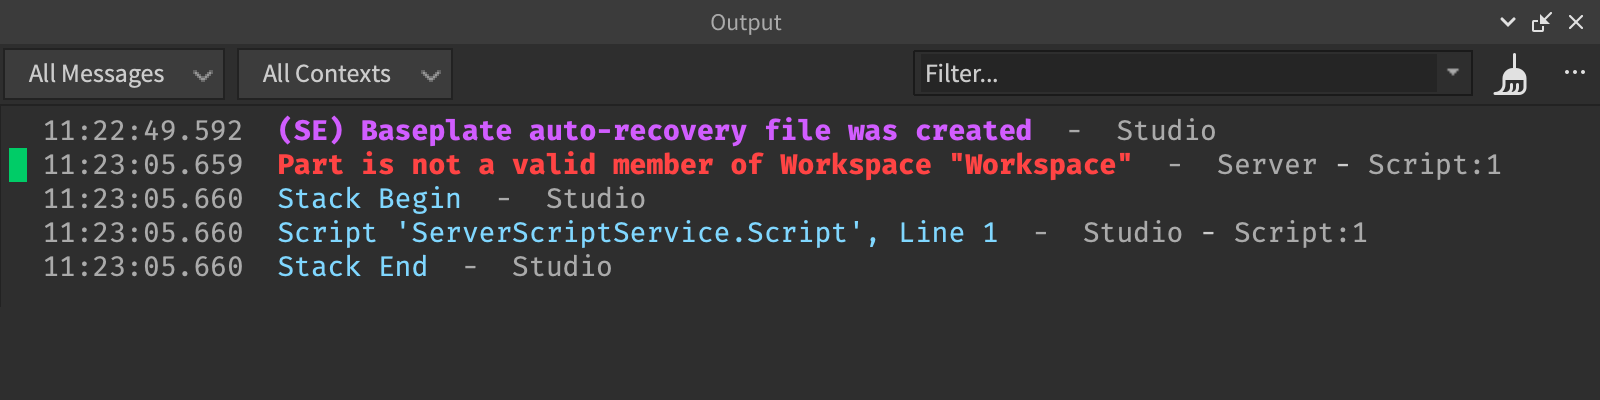
The Output window displays errors captured from running scripts, messages from the Roblox engine, messages from calls to print(), and errors from calls to warn().
Code Assist#
Code Assist is a feature that suggests lines or functions of code as you type, helping you code more efficiently and stay focused. Based on contexts from your comment and code, suggestions will be triggered in two ways:
- Automatically when you pause on a line for a few seconds and the AI model has enough context for a suggestion.
- Manually with shortcut Alt∖ on Windows or ⌥∖ on Mac.
Press Tab to accept a suggestion, or ignore it by continuing to type. Currently, your script needs to contain at least a few lines of code to trigger a suggestion.
Code Assist helps automate basic coding tasks so you can focus on creative work, but it does not always suggest perfect code (see Limitations). It's still your responsibility to review, test, and determine if the code suggestion is contextually appropriate.
Improve suggestions#
To get more accurate and relevant suggestions, it's recommended that you follow clean coding practices, regardless of assistance, and:
- Break down your code into smaller functions.
- Use descriptive script names that capture the overall intent of what each script does. For example, name a script SyncCustomSounds instead of just Sounds.
- Assign descriptive names for parameters, functions, and scripts. For example, name a part GreenSphere instead of simply grs, or name a function
generateSphere()instead ofgen(). Using named functions versus anonymous functions can also produce better hints. - Consistently include well-written comments that describe the task you're implementing and what the inputs/outputs should be.
- Consider including some sample calls with expected results in comments.
- Suggest how to solve a problem, for instance
-- Use raycast. - Use the exact function or variable name you defined, for example
-- Create 10 greenSphere objectsinstead of-- Create 10 spheres.
- If you're a novice scripter, start with basic projects such as "make the player jump when they touch the part" or use the tool to generate small code snippets that you can expand upon as your knowledge grows.
Limitations#
The tool helps automate basic coding tasks but it does not always suggest perfect code. Known limitations include:
- Manual triggering does not always force-generate a suggestion.
- Suggestions are machine learned from a corpus of code and can thus reflect some limitations of the code they're trained on. For example, suggestions may not use newer APIs in favor of older APIs, or they may use Lua instead of Luau.
- The tool may generate incorrect or misleading information that is not useful for your purpose.
- Internal filters attempt to block offensive language, but they're not all-encompassing and there's a possibility the tool may generate offensive or biased information.
- The suggestions may be the same, similar, or different among users, even with the same prompts. Your code, however, will never be shared with others.
- The suggestion may be incomplete due to the limited length of output from the learning models.
- There's a daily cap for the number of suggestions and, once the cap is reached, you will get no suggestions until the next day.
Code privacy#
Currently, Roblox does not use any non-public data to train the learning models. The tool only uses a small subset of free marketplace assets for tuning large language models and the subset has passed various checks for quality and safety filters.
Furthermore, all suggestions are generated by the AI model and do not transfer from one user to another. Since your code is not used for model training, it won't be suggested to other users of Code Assist, with the one exception of code being posted to free marketplace items.
Multi-cursor#
The Script Editor supports usage of multiple cursors to make edits simultaneously. You can add cursors based on your needs with a mouse click or keyboard shortcut. The initial cursor is called the primary cursor and additional cursors are called secondary cursors.
- Edits that you make at the primary cursor copy to the secondary cursors. Each edit counts as one action, so undo/redo of an edit applies to all cursors.
- Widgets such as autocomplete appear on the primary cursor but not the secondary cursors.
- All of the standard keyboard shortcuts for script editing work with multi-cursor editing, including code indentation, toggling comments, and deleting lines.
The following table summarizes multi-cursor workflows and their shortcuts.
| Command | Windows | Mac |
|---|---|---|
| Add/remove cursor at mouse location | Alt + click | ⌥ + click |
| Remove most recently added cursor | CtrlU | ⌘U |
| Add/modify cursor on mouse drag | Alt + drag | ⌥ + drag |
| Add cursor above/below | CtrlAlt↑ / CtrlAlt↓ | ⌘⌥↑ / ⌘⌥↓ |
| Add cursor to next matching selection | CtrlD | ⌘D |
| Add cursor to every matching selection | ShiftAltL | Shift⌥L |
| Column/block select | ShiftAlt + drag | Shift⌥ + drag |
| Split selections into lines | ShiftAltI | Shift⌥I |
To remove all secondary cursors, exit multi-cursor editing, and return to the primary cursor, press Esc.
Add cursors#
You can add cursors with a combination of keyboard shortcuts and mouse maneuvers. Cursors merge if they occupy the same space, such as if you add cursors with arrow keys or delete all the characters between cursors.
At mouse location#
To add a cursor at your mouse pointer location:
Hold Alt on Windows or ⌥ on Mac.
Click where you want to add the cursor.
With mouse drag#
You can drag the mouse to add a cursor to a selection, split a multi-line selection into lines, or select columns and blocks of code/whitespace.
Drag select
To add a cursor to a selection of code through dragging:
Hold Alt on Windows or ⌥ on Mac.
Click and drag your mouse over the selection of code.
Split into lines
To split a multi-line selection into lines and add a cursor at the end of each line, press ShiftAltI on Windows or Shift⌥I on Mac.
Column/block select
To select columns and blocks of code or whitespace, drag the mouse while holding ShiftAlt on Windows or Shift⌥ on Mac. As you drag, a cursor will be added on each highlighted line.
Above and below primary cursor#
To add a cursor directly above or below the primary cursor:
Press and hold CtrlAlt on Windows or ⌘⌥ on Mac.
Press the ↑ or ↓ arrows.
To matching selections#
You can add cursors to all matches of a selection or to the next/previous match, and optionally toggle whether matches are case-sensitive and/or match the whole word.
All matching
To add a cursor to all matches of a selected portion:
Select the code that you want to search for matches of.
Press ShiftAltL on Windows or Shift⌥L on Mac.
Next/previous match
To add a cursor to the next matching selection:
Select the code that you want to search for matches of.
Press CtrlD on Windows or ⌘D on Mac.
Continue pressing CtrlD or ⌘D until you've selected all the next matches that you want.
There is no default shortcut for adding a cursor to the previous matching selection, but you can add your own:
Open File ⟩ Advanced ⟩ Customize Shortcuts.
In the shortcuts window, locate Select previous occurrence.

Double-click the action's Shortcut field and enter your own custom key combination, such as ShiftCtrlD to pair alongside "next" matching's default of CtrlD.
Confirm your setting by clicking OK in the bottom-right corner of the window.
Case or whole word match
For each of the matching-related workflows above, you can match case and/or whole word as follows:
Open the Find/Replace tool (CtrlF on Windows or ⌘F on Mac).
Use the toggle buttons to choose if a matched selection should be case-sensitive and/or match the whole word only.
Remove cursors#
You can remove cursors with the following keyboard shortcuts and mouse maneuvers. Alternatively, you can exit multi-cursor editing by pressing Esc.
At mouse location#
To remove a cursor:
Press and hold Alt on Windows or ⌥ on Mac.
Click the cursor you want to remove.
Most recently added#
To remove the most recently added cursor, press CtrlU on Windows or ⌘U on Mac.
Copy and paste cursors#
Copying a selection of code includes the cursors within it. The behavior of the paste depends on the number of cursors at the source and the number of cursors at the destination:
- If the number of cursors are the same, then each copied cursor pastes to each corresponding destination cursor.
- If the number of cursors are different, then each cursor at the destination receives the entire paste with each copied cursor as a new line.
On-type formatting#
Pressing enter/return will auto-indent each cursor at the new line relative to the previous line. If the previous line starts with an incomplete block, the formatter will try to complete it.
Editor settings#
Many customization options are accessible via the Script Editor tab of Studio Settings. Commonly modified options include:
| Option | Description |
|---|---|
| Font | Font face and size for code in the editor. |
| Tab width | Number of spaces representing a Tab indent. |
| Indent using spaces | If enabled, spaces equal to Tab Width are inserted with Tab press. |
| Text wrapping | If enabled, longer lines of code wrap to the next line. |
| Script Editor color preset | Color preset for code elements, selection colors, and more. After choosing a preset, you can set specific colors for options like Selection Color and Comment Color. |
Keyboard shortcuts#
The Script Editor has the following keyboard shortcuts.
File and display
| Command | Windows | Mac |
|---|---|---|
| Close script | CtrlW | ⌘W |
| Reopen last closed script | CtrlShiftT | ⌘ShiftT |
| Quick open | CtrlP | ⌘P |
| Show script in Explorer | CtrlAltK | ⌘⌥K |
| Zoom in | Ctrl= | ⌘= |
| Zoom out | Ctrl- | ⌘- |
| Reset script zoom | Ctrl0 | ⌘0 |
Basic editing
| Command | Windows | Mac |
|---|---|---|
| Cut | CtrlX | ⌘X |
| Copy | CtrlC | ⌘C |
| Paste | CtrlV | ⌘V |
| Undo | CtrlZ | ⌘Z |
| Redo | CtrlY | Shift⌘Z |
| Select all | CtrlA | ⌘A |
| Find / Replace | CtrlF | ⌘F |
| Find all / replace all | CtrlShiftF | ⌘ShiftF |
| Indent / unindent | Ctrl\] / Ctrl\[ | ⌘\] / ⌘\[ |
| Toggle comment | Ctrl/ | ⌘/ |
| Expand all folds | CtrlE | ⌘E |
| Collapse all folds | CtrlShiftE | ⌘ShiftE |
| Delete line | CtrlShiftK | ⌘ShiftK |
| Delete to start of line | CtrlShiftBackspace | ⌘Delete |
| Move line up/down | Alt↑ / Alt↓ | ⌥↑ / ⌥↓ |
| Go to declaration | CtrlF12 | ⌘F12 |
| Open script function filter | AltF | ⌥F |
| Format selection | AltShiftF | ⌥ShiftF |
Multi-Cursor
| Command | Windows | Mac |
|---|---|---|
| Add/remove cursor at mouse location | Alt + click | ⌥ + click |
| Remove most recently added cursor | CtrlU | ⌘U |
| Add/modify cursor on mouse drag | Alt + drag | ⌥ + drag |
| Add cursor above/below | CtrlAlt↑ / CtrlAlt↓ | ⌘⌥↑ / ⌘⌥↓ |
| Add cursor to next matching selection | CtrlD | ⌘D |
| Add cursor to every matching selection | ShiftAltL | Shift⌥L |
| Column/block select | ShiftAlt + drag | Shift⌥ + drag |
| Split selections into lines | ShiftAltI | Shift⌥I |