Weapons kit
The Weapons Kit assists in creating competitive combat-based games.
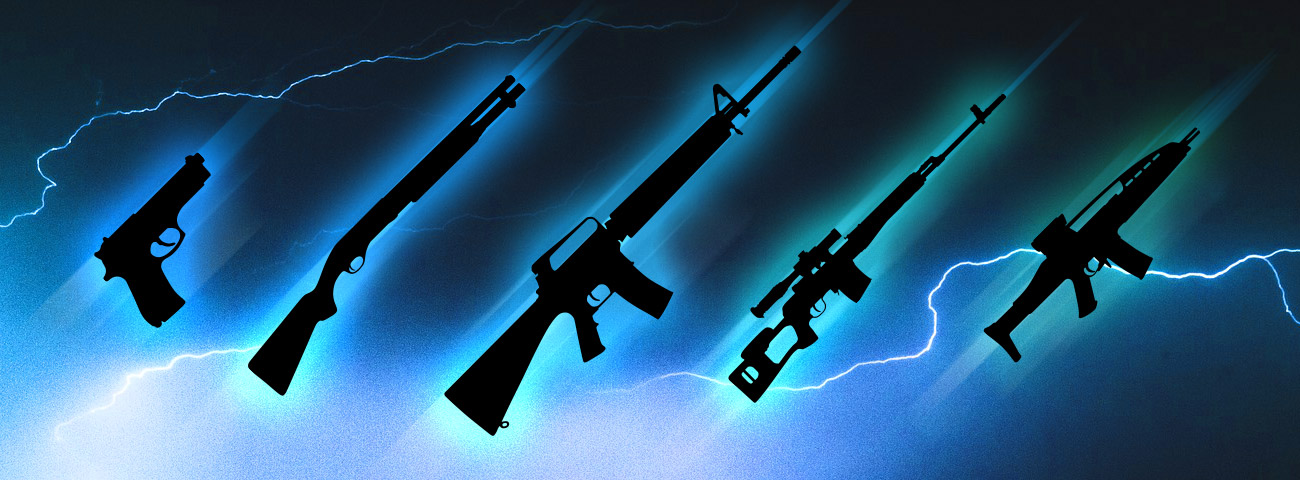
Roblox offers the following prefab weapons to assist in creating competitive combat-based games. The core system features projectile-based weapons with an over-the-shoulder camera, and setting the projectile speed high enough can simulate raycasting weapons like laser guns.
The content of this project and documentation can be used under Roblox's Limited Use License.
To use a prefab weapon in your game:
- Select a weapon from below, navigating to the asset library link.
On the weapon's item page, click the Get Model button and confirm the transaction.
In Studio, open the Toolbox and select your Inventory section.
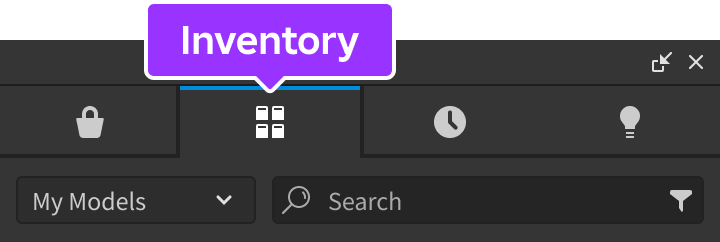
Locate the weapon and click it to add it into the place. When prompted whether to put the tool into the starter pack, click Yes if you want players to start with the weapon in their backpack, or click No to simply place the weapon in the 3D world as a pickup.
If this is the first time bringing in a prefab weapon, move its
WeaponsSystemfolder intoServerScriptServiceto serve as the unified system folder for all prefab weapons in the game.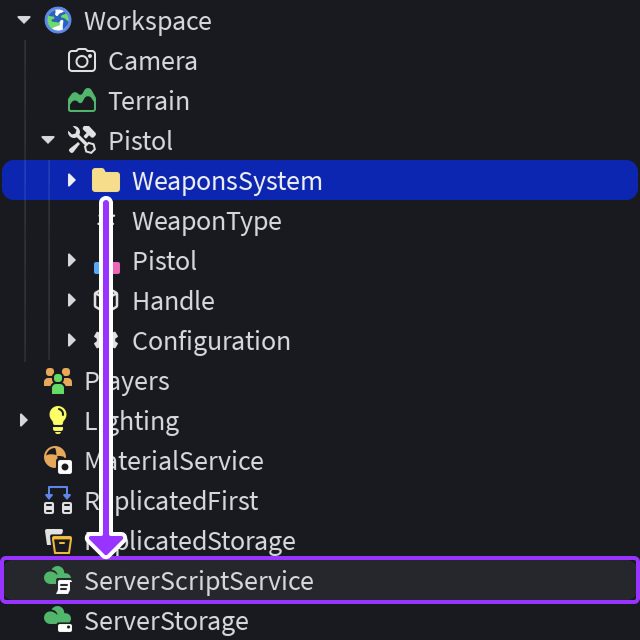
System folder structure#
The WeaponsSystem folder is a unified folder that contains assets, configurations, and scripts that power all prefab weapons in the game. If located in ServerScriptService, it overrides any equivalent WeaponsSystem folders that may reside within individual weapons.
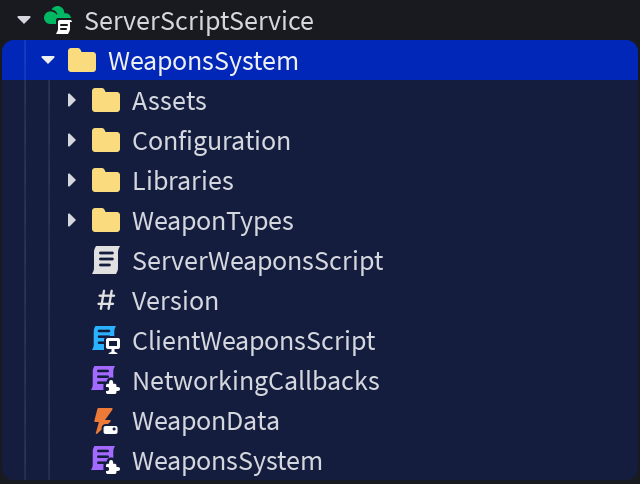
Within the WeaponsSystem folder, different aspects are controlled by the following ModuleScripts:
| Aspect | Handled primarily within... |
|---|---|
| Weapons functionality |
|
| Shoulder camera |
|
| Weapons GUI |
|
Weapon structure#
Prefab weapons are tools and are named as they will appear in the player's backpack. Each weapon is structured with a similar hierarchy.
Weapon type#
The WeaponType StringValue corresponds with the ModuleScript for the weapon in the WeaponsSystem/WeaponTypes folder. The two base values are BulletWeapon and BowWeapon.
Weapon model#
Each weapon contains a Model made up of one or more BaseParts to form the physical weapon. One of these should be set as the model's PrimaryPart.
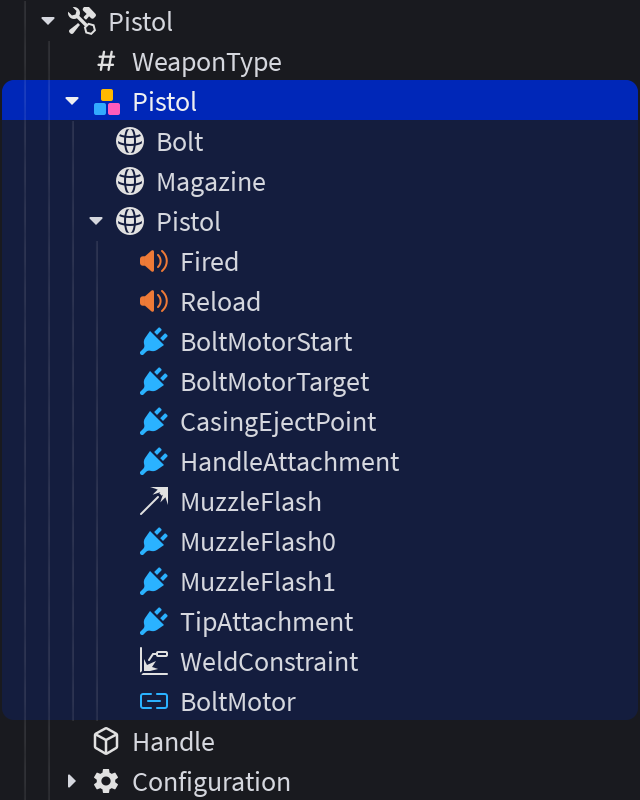
The model also includes the following important descendants which may be parented to one of the model's BaseParts:
TipAttachment—Attachmentwhose position on the parentBasePartdetermines where bullets/projectiles come out.HandleAttachment—Attachmentwhose position on the parentBasePartdetermines where the tool's handle is welded.Firedoptional —Soundthat plays when the weapon is fired.Reloadoptional —Soundthat plays when the weapon is reloaded.- Additional descendants for any specialized options.
Configuration#
The Configuration folder contains specific "value" types for weapon behavior. Beyond the defaults, you can add additional configuration items for specialized options when applicable.
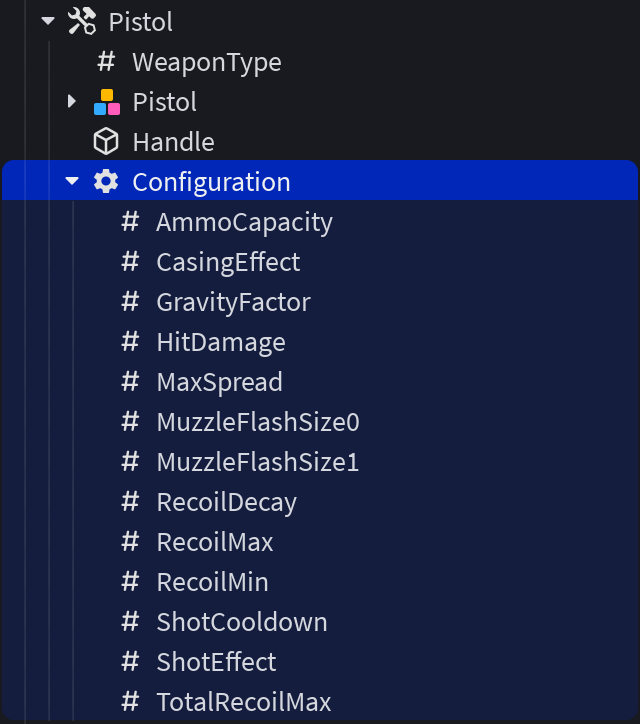
As follows are the base configurations and their default values:
| Item | Description | Default |
|---|---|---|
AimTrack |
Name of the aim animation track in Assets/Animations of the system folder. |
RifleAim |
AimZoomTrack |
Name of the aim zooming animation track in Assets/Animations of the system folder. |
RifleAimDownSights |
AmmoCapacity |
Number of shots in each "ammo clip" before player must reload. Note that ammo is unlimited and this does not specify how much ammo a player is carrying. | 30 |
BulletSpeed |
Speed that bullets/projectiles travel when shot. Setting this to a very high value like 20000 simulates raycasting weapons like laser guns. |
1000 |
BurstShotCooldown |
Time between each shot in a burst; only matters if you set FireMode to Burst. |
Value of ShotCooldown |
FiredPlaybackSpeedRange |
Amount that the pitch can vary for the Fired sound of the weapon. Set this to 0 to always play it at the same pitch. |
0.1 |
FireMode |
Choose from either Semiautomatic (one shot per click/tap), Automatic (continuous fire), or Burst (burst of shots equal to NumBurstShots on each click/tap). |
Semiautomatic |
FullDamageDistance |
Maximum distance that shots will do full damage. Anything hit beyond this distance will receive less and less damage as the distance nears ZeroDamageDistance. |
1000 |
GravityFactor |
Amount that gravity should influence each bullet/projectile. For example, this value for the [Crossbow][Marketplace-Crossbow] is 1 because arrows arc during flight, but this value for the [Rocket Launcher][Marketplace-Rocket-Launcher] is 0 because propelled rockets travel straight. |
0 |
HasScope |
Set to true if you want to use the scope that's specified in Weapons GUI. |
false |
HitDamage |
Amount of damage each direct hit does. | 10 |
MaxDistance |
Maximum distance bullets/projectiles travel before disappearing. | 2000 |
MaxSpread |
Maximum amount of spread for the weapon. | Value of MinSpread |
MinSpread |
Minimum amount of spread for the weapon. | 0 |
NumBurstShots |
Number of shots per click/burst; only matters if you set FireMode to Burst. |
3 |
NumProjectiles |
Number of bullets/projectiles that will fire at the same time when you click/tap once. This is useful for weapons like the [Shotgun][Marketplace-Shotgun] that fires multiple bullets at same time. Note that one shot will always use exactly one ammo regardless of this value. | 1 |
RecoilDecay |
Decay multiplier for recoil; essentially the rate at which recoil diminishes after shooting. | 0.825 |
RecoilDelayTime |
Waiting time after shooting/clicking before recoil is added to camera. | 0.07 |
RecoilMax |
Maximum recoil added for each shot. | 0.5 |
RecoilMin |
Minimum recoil added for each shot. | 0.05 |
ReloadAnimation |
Name of the reload animation track in Assets/Animations of the system folder. |
RifleReload |
ShotCooldown |
Minimum waiting time between clicks. For weapons with FireMode of Automatic, this is also the time between shots while pressing the fire button or holding click. |
0.1 |
StartupTime |
Length of time after equipping the weapon before the player can shoot. This prevents players from firing a single shot from multiple different weapons in quick succession. | 0.2 |
TotalRecoilMax |
Total maximum accumulated recoil. Weapon's current recoil will never exceed this value. | 2 |
ZeroDamageDistance |
Anything hit at or beyond this distance will receive no damage. | 10000 |
Specialized options#
You can add/modify the following options for any weapon. These customizations require modifying either the weapon's Model, the weapon's Configuration, or both. Some configurations are dependent on others, such as muzzle particles which require the necessary children for projectile/hit effects and sounds.
Bolt animations and sounds#
A weapon's bolt is the part that moves back and forth each time it's fired.
Descendants of the weapon's weapon model:
Bolt—BasePartthat moves when the weapon is fired.BoltMotor—Motor6Dused to animate the bolt. Make sure to set the motor'sPart0to the weapon model'sPrimaryPartandPart1to theBoltpart.BoltMotorStart—Attachmentwhose position on the parentBasePartdetermines where the bolt is when it's at rest.BoltMotorTarget—Attachmentwhose position on the parentBasePartdetermines where the bolt animates to when shooting.BoltOpenSoundoptional —Soundthat plays when the bolt opens.BoltCloseSoundoptional —Soundthat plays when the bolt closes.
Descendants of the weapon's configuration folder:
ActionOpenTimeoptional — Time it takes for the bolt to animate to open position. Default is0.025.ActionCloseTimeoptional — Time it takes for the bolt to animate to closed position. Default is0.075.
Ejected bullet casings#
Weapons can include physical bullet casings that eject upon firing and fall to the ground.
Descendants of the weapon's weapon model:
CasingEjectPoint—Attachmentwhose position on the parentBasePartdetermines where you want bullet casings to pop out. Note that its orientation determines the direction that casings pop out.
Descendants of the weapon's configuration folder:
CasingEffect— Name of casingBasePartinAssets/Effects/Casingsof the system folder.CasingEjectSpeedMinoptional — Minimum eject speed of casings. Default is15.CasingEjectSpeedMaxoptional — Maximum eject speed of casings. Default is18.
Child of the casing
BasePartinAssets/Effects/Casingsof the system folder:CasingHitSoundoptional —Soundthat plays when casings hit the ground.
Projectile/hit effects and sounds#
You can configure physical projectiles for any weapon, along with Sounds, Beams, and ParticleEmitters for hit effects and other special effects.
Descendants of the weapon's configuration folder:
ShotEffect— Name of a shot effect stored withinAssets/Effects/Shotsof the system folder.ShouldMovePartoptional — Set totrueif the weapon'sShotEffectshould move with the projectile orfalseif not. You should only set this totrueif there's a visible object that moves with each shot, such as an arrow or rocket. Default isfalse.BeamFadeTimeoptional — Time it takes forBeam0orBeam1(see below) to fade after the bullet/projectile hits something. By default, no manual fade will be applied by code. Default is0.BeamWidth0optional — Thickness ofBeam0orBeam1atAttachment0(see below). Default is1.5.BeamWidth1optional — Thickness ofBeam0orBeam1atAttachment1(see below). Default is1.8.NumHitParticlesoptional — Number of particles theHitParticles(see below) emitter will emit. Default is3.HitParticlesUsePartColoroptional — Set totrueif you want the hit particles to be the color of the hit surface;falseif you want hit particles to not change color. Default istrue.
Descendants of the specified
ShotEffectnoted in the above section:Flyingoptional —Soundthat plays while the bullet/projectile is traveling.Beam0optional — First slot for a trailingBeambehind the bullet/projectile. Don't forget to setAttachment0andAttachment1.Beam1optional — Second slot for a trailingBeambehind the bullet/projectile. Don't forget to setAttachment0andAttachment1.Attachment0optional —Attachmentwhose position on the parentBasePartdetermines the back of trailing beams; make sure to setBeam.Attachment0on bothBeam0andBeam1to this.Attachment1optional —Attachmentwhose position on the parentBasePartdetermines the front of trailing beams; make sure to setBeam.Attachment1on bothBeam0andBeam1to this.TrailParticlesoptional —ParticleEmitterparented as a direct child ofAttachment0; this will emit while the bullet/projectile is traveling.LeadingParticlesoptional —ParticleEmitterparented as a direct child ofAttachment1; this will emit while the bullet/projectile is traveling.HitEffectoptional —Attachmentwhose position will be set toBeam.Attachment1ofBeam0when the bullet/projectile hits. You must specifyBeam0and its attachments for this to work properly.HitSoundoptional —Soundparented as a direct child ofHitEffect; plays when the bullet/projectile hits.HitParticlesoptional —Soundparented as a direct child ofHitEffect; emits when the bullet/projectile hits.Meshoptional —SpecialMeshthat you want to appear as a physical projectile. Make sure you setShouldMovePartin the weapon's configuration totrueif you have a visible object here.
Muzzle particles#
This option emits particles from the specified ParticleEmitter at the weapon's TipAttachment Attachment when it's fired. Descendants of the weapon's configuration folder include:
ShotEffect— Name of a shot effect stored withinWeaponsSystem/Assets/Effects/Shots. As a child of this shot effect, include aParticleEmitterasset namedMuzzleParticles.NumMuzzleParticlesoptional — Number of muzzle particles that will be emitted. Default is50.
Muzzle flashes#
This option creates a Beam flash effect when the weapon is fired.
Descendants of the weapon's weapon model:
MuzzleFlash0—Attachmentused to specify one side of muzzle flash. Position doesn't matter.MuzzleFlash1—Attachmentused to specify opposite side of muzzle flash. Position doesn't matter.MuzzleFlash—Beamfor the muzzle flash effect. Make sure to set the beam'sAttachment0toMuzzleFlash0andAttachment1toMuzzleFlash1.
Descendants of the weapon's configuration folder:
MuzzleFlashTimeoptional — Length of time muzzle flash will show for. Default is0.03.MuzzleFlashRotation0optional — Minimum rotation of muzzle flash. Default is-math.pi.MuzzleFlashRotation1optional — Maximum rotation of muzzle flash. Default ismath.pi.MuzzleFlashSize0optional — Minimum size of muzzle flash. Default is1.MuzzleFlashSize1optional — Maximum size of muzzle flash. Default is1.
Particle trails#
This option creates a trail of varying length from the weapon to the projectile impact point. Descendants of the weapon's configuration folder include:
TrailLengthoptional — Length of trail behind bullet/projectile; default isnilwhich means the trail length will instead be calculated usingTrailLengthFactor.TrailLengthFactoroptional — If specified, the trail length will be set to this value multiplied by the distance the bullet/projectile traveled in the last frame; default is1. Note that this will be overridden if you includeTrailLength.ShowEntireTrailUntilHitoptional — Set totrueto render the trail from the weapon tip all the way to wherever the projectile is; this will override bothTrailLengthandTrailLengthFactorand the trail will only disappear once the projectile hits something. Set tofalseto use one of the above two options to calculate trail length. Default isfalse.
Hit marks#
This visual addition appears on the surface where projectiles hit and is useful for arrows, bullet holes, scorch marks, etc. Descendants of the weapon's configuration folder include:
HitMarkEffectoptional — Name of aPart/MeshPart/SpecialMeshhit mark effect stored withinWeaponsSystem/Assets/Effects/HitMarks. Default isBulletHole.AlignHitMarkToNormaloptional — Set totrueif the hit mark should always align flat against the surface like a bullet hole, orfalseif the hit mark should appear stuck in the surface from the direction the projectile came from (like an arrow). Default istrue.
As noted by HitMarkEffect above, you can add a part/mesh within WeaponsSystem/Assets/Effects/HitMarks to appear as a physical projectile. For example, including an arrow MeshPart and setting AlignHitMarkToNormal to false will make the arrow stick out of the surface from the direction you shot it. This Part/MeshPart/SpecialMesh may contain the following descendants:
Glowoptional —Decalwhich appears on the hit surface fully opaque, then rapidly gets more transparent, like a glowing effect on the surface that fades quickly. Useful for things like showing a glowing red mark where explosives hit.BulletHoleoptional —Decalwhich appears on the hit surface fully opaque and, after 4 seconds, fades to transparent over 1 second.ImpactBillboardoptional —BillboardGuiwhich displays at the hit surface, always facing towards the camera.Impactoptional —ImageLabelas a direct child ofImpactBillboard; this begins fully opaque, grows to the full size of theImpactBillboardover0.1seconds, then shrinks to half its size and fades to full transparency over0.1seconds.
Exploding projectiles#
Projectiles can include an Explosion object to damage player characters in an area around the impact point. Descendants of the weapon's configuration folder include:
ExplodeOnImpactoptional — Set totrueif you want bullets/projectiles for the weapon to explode on impact,falseotherwise. Default isfalse.BlastRadiusoptional —BlastRadiusof explosion; default is8.BlastPressureoptional —BlastPressureof explosion; default is10000.BlastDamageoptional — Damage dealt to things in the center of the explosion. Note that the explosion does less damage the farther away hit objects are from the center of the explosion. Default is100.
Charging weapon#
A charging weapon like the Railgun must be charged up between shots before it can fire again.
Descendants of the weapon's weapon model:
Chargingoptional —Soundwhich plays while the weapon is charging.Dischargingoptional —Soundwhich plays while the weapon is discharging, for example if you charge the weapon just partially and release the shoot button.ChargeCompleteoptional —Soundwhich plays when the weapon has reached full charge.DischargeCompleteoptional —Soundwhich plays when the weapon has completely discharged.ChargeGlowoptional —BasePartwhich will get less transparent as the weapon charges up, such that it will be fully opaque at 100% charge.ChargeCompleteParticlesoptional —ParticleEmitterwhich emits when the weapon has finished charging. This emitter can be a child of any modelBasePartor a child of anAttachmentwithin theBasePart.DischargeCompleteParticlesoptional —ParticleEmitterwhich emits when the weapon has completely discharged. This emitter can be a child of any modelBasePartor a child of anAttachmentwithin theBasePart.ChargingParticlesoptional —ParticleEmitterwhich emits while the weapon is charging. You can include multiple emitters of this name and each will emit while charging. This emitter can be a child of any modelBasePartor a child of anAttachmentwithin theBasePart.
Descendants of the weapon's configuration folder:
ChargeRate— Rate at which the weapon will charge. This value must be specified to indicate that the weapon uses charging.DischargeRateoptional — Rate at which the weapon will discharge. Default is0which means the weapon will not discharge at all.ChargePassivelyoptional — Set totrueif you want the weapon to passively charge so it will shoot instantly when you click, orfalseif you want to click/touch to charge the weapon and have it fire once full charge is reached. Default isfalse.ChargingParticlesRatePerChargeoptional — Number of particles that will emit out of allChargingParticlesemitters multiplied by the current charge of the weapon. Default is20, meaning that if the weapon charge is at 10%, eachChargingParticlesemitter will emit 2 particles (20*0.1), and if the weapon charge is at 90%, each emitter will emit 18 particles (20*0.9).FireDischargeoptional — Amount of charge the weapon will lose after firing a fully charged shot. Default is1.NumChargeCompleteParticlesoptional — Number of particles theChargeCompleteParticlesemitter will emit once the weapon is fully charged. Default is25.NumDischargeCompleteParticlesoptional — Number of particles theDischargeCompleteParticlesemitter will emit when the weapon is completely discharged. Default is25.
Bow weapon#
A bow weapon like the Crossbow can include a realistic string and arms construction, as well as a visual arrow nocked to the string.
In addition to adding model descendants, you need to apply the following:
- Make the weapon into a charging weapon. For example, add the required
ChargeRatewithin the weapon'sConfigurationthat specifies how fast the string is drawn. Additionally, consider adding optional descendants to the weapon'sModelsuch as aChargingsound for the string/arms being pulled back. - Set the
WeaponTypetoBowWeaponas indicated in weapon structure.
Descendants of the weapon's weapon model include:
LeftStringoptional —Beamfor the visual left half of the string.RightStringoptional —Beamfor the visual right half of the string.Arrowoptional —BasePartfor the arrow that appears when the bow is fully drawn. Note that this is only for visual appearance on the bow (the actual fired arrow will be aShotEffectas outlined in projectile/hit effects and sounds).String1—Attachmentfor the center point of the string.StringLoose—Attachmentpoint whereString1should be when the bow is at rest.StringTight—Attachmentpoint whereString1should be when the bow is fully drawn.Armsoptional —Partthat just serves as an internal indicator that the bow arms will be animated. This may contain the following direct children:LeftString0—Attachmentpoint where the left side of the string is attached to the bow.RightString0—Attachmentpoint where the right side of the string is attached to the bow.LeftLoose—Attachmentpoint whereLeftString0should be when the bow is at rest.RightLoose—Attachmentpoint whereRightString0should be when the bow is at rest.LeftTight—Attachmentpoint whereLeftString0should be when the bow is fully drawn.RightTight—Attachmentpoint whereRightString0should be when the bow is fully drawn.Mesh—SpecialMeshpart of the bow that will actually bend when the bow is drawn. Note that you must specify the following fourVector3Valueobjects to make this animate.LooseOffset—Vector3Valueoffset of theSpecialMeshwhen the bow is at rest.TightOffset—Vector3Valueoffset of theSpecialMeshwhen the bow is fully drawn.LooseScale—Vector3Valuescale of theSpecialMeshwhen the bow is at rest.TightScale—Vector3Valuescale of theSpecialMeshwhen the bow is fully drawn.
Weapons GUI#
The core weapons system interfaces with this system to update the GUI based on things like spread of the gun, indicators for when you get hit or hit others, etc.
The WeaponsSystemGui is a ScreenGui object in WeaponsSystem/Assets that is parented to PlayerGui when the game starts. WeaponSystemGui has four descendants as follows:
ScalingElementsis aFolderwith the following descendants:DirectionalIndicators—Folderwhere all directional indicators are stored.Crosshair— AFramecontaining aUIAspectRatioConstraintand image labels for the bottom, left, right, and top elements of the crosshair.HitMarker— AFramecontaining aUIAspectRatioConstraintand aHitMarkerImageimage label that appears and fades when the player successfully hits another player character.
LargeTouchscreenis aFramecontainingAimButtonandFireButtonbuttons that display on large touchscreens.Scopeis aFramethat contains theScopeImageimage label which shows up when zooming on a weapon withHasScopeenabled (see weapon structure).SmallTouchscreenis aFramecontainingAimButtonandFireButtonbuttons that display on small touchscreens.
Directional indicators#
Directional indicators are used to show the direction of something around the player's crosshair. For example, if someone shoots you, a red semi-circle can show up around your crosshair in the direction the shot came from. Other examples include indicators to show the direction of footsteps, indirect gunfire, or even environmental objects such as chests.
To create a new indicator, add a new Frame in WeaponsSystemGui/ScalingElements/DirectionalIndicators with the following structure:
- Indicator (
Frame)UIAspectRatioConstraintImageLabelfor the directional indicator. Tweaking the rotation of the image in Studio may be required unless you upload the image so that it's facing down and there's little or no blank space around it. This image label must also contain its ownUIAspectRatioConstraint.Configurationcontaining optional properties to adjust:DistanceLevelFromCenteroptional — Number of distance levels from the center of the screen (each distance level is about0.03screen scale). Default is6.FadeTimeoptional — Indicator fade time following its activation and theTimeBeforeFadetime. Default is1.Nameoptional — Name of the directional indicator as you want to reference it in code. Default is the name of the indicator's top-levelFrame.TimeBeforeFadeoptional — Number of seconds that the indicator will appear for before fading. Default is1.TransparencyBeforeFadeoptional — Transparency of the indicator before it starts to fade. Default is0.WidthLeveloptional — Number of width levels from center (each width level is about0.03screen scale). Default is the value ofDistanceLevelFromCenter.
Once created, you can activate an indicator via the following command inside WeaponsSystem/Libraries/WeaponsGui where indicatorName is the string name of the indicator to activate and worldPos is the world position where the directional indicator should point:
self.DirectionalIndicatorGuiManager:ActivateDirectionalIndicator(indicatorName, worldPos)If an indicator is activated an additional time before it has had time to fade completely, a new indicator of that type will be instantiated. This allows an unlimited number of any type of indicator to be activated at the same time.
You can also activate directional indicators from outside of WeaponsGui by replacing self in the above code with the instance of WeaponsGui in your code. However, it's recommended that you activate it from inside WeaponsGui and trigger it via a RemoteEvent or a BindableEvent. For reference, see how DamageIndicator is activated within WeaponsGui.
Damage billboard#
The damage billboard is used to show numbers above a character's head when they are damaged. These will only show up for the player that damaged another player's character, not for spectating players.
Damage billboards are handled in WeaponsSystem/Libraries/DamageBillboardHandler and can be activated from any client-side code as follows, where damage is the amount of damage done and adornmentPart is the part on which to adorn the billboard, such as the victim's head:
DamageBillboardHandler:ShowDamageBillboard(damage, adornmentPart)Shoulder camera#
The shoulder camera is a third-person camera that looks over the player character's right shoulder. To customize the shoulder camera, modify the variables under the -- Configuration parameters (constants) comment in the ShoulderCamera.new() function of WeaponsSystem/Libraries/ShoulderCamera. You can modify things such as field of view, offset from the character, walk speed while sprinting or zooming, etc.
Sprint and zoom#
By default, the weapons system adds "sprint" capability so players can sprint by holding the Shift key, pushing fully up on the dynamic thumbstick (mobile), or pushing fully up on the left joystick (gamepad). If you want to disable sprinting, set the value of SprintEnabled within WeaponsSystem/Configuration to false.
The system also reduces player speed while they're aiming/zooming, but you can disable this behavior by setting the value of SlowZoomWalkEnabled within WeaponsSystem/Configuration to false.