UI animation/tweens
Explains how to animate GuiObjects using the process of tweening.
In animation, tweening is the process of generating intermediate frames between two key points in a sequence. When designing a user interface, you can use tweening to transition a GuiObject smoothly from one state to another, such as:
- Smoothly increasing the size of a button when a user selects it.
- Sliding UI menus in and out from the screen edges.
- Gradually animating a health bar between two widths when a user receives a health boost.
Single-property tweens#
Position#
To tween the position of a GuiObject:
- Set the
AnchorPointfor the object. - Determine
UDim2coordinates for the object's target position, using the scale parameters ofUDim2instead of exact pixel values so that the object tweens to the exact center of the screen. - Pass a
TweenInfoand the target position toTweenService:Create(). - Play the tween with
Tween:Play().
The following code snippet moves an ImageLabel within a ScreenGui to the exact center of the screen:
local TweenService = game:GetService("TweenService")
local Players = game:GetService("Players")

local PlayerGui = Players.LocalPlayer:WaitForChild("PlayerGui")
local ScreenGui = PlayerGui:WaitForChild("ScreenGui")
local object = ScreenGui:WaitForChild("ImageLabel")

object.AnchorPoint = Vector2.new(0.5, 0.5)

local targetPosition = UDim2.new(0.5, 0, 0.5, 0)

local tweenInfo = TweenInfo.new(2)
local tween = TweenService:Create(object, tweenInfo, {Position = targetPosition})

tween:Play()Size#
To tween the size of a GuiObject:
- Determine
UDim2coordinates for the object's target size, using the scale parameters ofUDim2instead of exact pixel values so that the object tweens to a relative percentage of the screen size. - Attach a
UIAspectRatioConstraintto the object to maintain its designed aspect ratio when tweening. - Pass a
TweenInfoand the target size toTweenService:Create(). - Play the tween with
Tween:Play().
The following code snippet scales an ImageLabel within a ScreenGui to 40% of the screen width or height (whichever is smaller) from the object's center anchor point:
local TweenService = game:GetService("TweenService")
local Players = game:GetService("Players")

local PlayerGui = Players.LocalPlayer:WaitForChild("PlayerGui")
local ScreenGui = PlayerGui:WaitForChild("ScreenGui")
local object = ScreenGui:WaitForChild("ImageLabel")

object.AnchorPoint = Vector2.new(0.5, 0.5)

local aspectRatioConstraint = Instance.new("UIAspectRatioConstraint")
aspectRatioConstraint.Parent = object

local targetSize = UDim2.new(0.4, 0, 0.4, 0)

local tweenInfo = TweenInfo.new(2)
local tween = TweenService:Create(object, tweenInfo, {Size = targetSize})

tween:Play()Rotation#
To tween the rotation of a GuiObject:
- Set the
AnchorPointfor the object to rotate around. - Determine the target
Rotationfor the object. - Pass a
TweenInfoand the target rotation toTweenService:Create(). - Play the tween with
Tween:Play().
local TweenService = game:GetService("TweenService")
local Players = game:GetService("Players")

local PlayerGui = Players.LocalPlayer:WaitForChild("PlayerGui")
local ScreenGui = PlayerGui:WaitForChild("ScreenGui")
local object = ScreenGui:WaitForChild("ImageLabel")

object.AnchorPoint = Vector2.new(0.5, 0.5)

local targetRotation = 45

local tweenInfo = TweenInfo.new(2)
local tween = TweenService:Create(object, tweenInfo, {Rotation = targetRotation})

tween:Play()Transparency#
Multiple properties control UI transparency, depending on the object type. You can tween each of these properties individually or combined through a multi-property tween. Alternatively, you can tween an object's overall transparency by placing it inside a CanvasGroup and tweening the group's GroupTransparency.
As a modern alternative to TextLabel.TextStrokeTransparency and TextButton.TextStrokeTransparency, you can tween stroke transparency on a UIStroke object as outlined in Stroke.
local TweenService = game:GetService("TweenService")
local Players = game:GetService("Players")

local PlayerGui = Players.LocalPlayer:WaitForChild("PlayerGui")
local ScreenGui = PlayerGui:WaitForChild("ScreenGui")
local object = ScreenGui:WaitForChild("ImageLabel")

local targetTransparency = 0.8

local tweenInfo = TweenInfo.new(2)
local tween = TweenService:Create(object, tweenInfo, {ImageTransparency = targetTransparency})

tween:Play()local TweenService = game:GetService("TweenService")
local Players = game:GetService("Players")
local PlayerGui = Players.LocalPlayer:WaitForChild("PlayerGui")
local ScreenGui = PlayerGui:WaitForChild("ScreenGui")
local canvasGroup = ScreenGui:WaitForChild("CanvasGroup")
local targetTransparency = 0.8
local tweenInfo = TweenInfo.new(2)
local tween = TweenService:Create(canvasGroup, tweenInfo, {GroupTransparency = targetTransparency})
tween:Play()Color#
Multiple properties control UI color, depending on the object type. You can tween each of these properties individually or combined through a multi-property tween. Alternatively, you can tween an object's overall color by placing it inside a CanvasGroup and tweening the group's GroupColor3.
As a modern alternative to GuiObject.BorderColor3, TextLabel.TextStrokeColor3, and TextButton.TextStrokeColor3, you can tween stroke color on a UIStroke object as outlined in Stroke.
local TweenService = game:GetService("TweenService")
local Players = game:GetService("Players")

local PlayerGui = Players.LocalPlayer:WaitForChild("PlayerGui")
local ScreenGui = PlayerGui:WaitForChild("ScreenGui")
local object = ScreenGui:WaitForChild("ImageLabel")

local targetColor = Color3.fromRGB(255, 0, 0)

local tweenInfo = TweenInfo.new(2)
local tween = TweenService:Create(object, tweenInfo, {ImageColor3 = targetColor})

tween:Play()local TweenService = game:GetService("TweenService")
local Players = game:GetService("Players")
local PlayerGui = Players.LocalPlayer:WaitForChild("PlayerGui")
local ScreenGui = PlayerGui:WaitForChild("ScreenGui")
local canvasGroup = ScreenGui:WaitForChild("CanvasGroup")
local targetColor = Color3.fromRGB(255, 0, 0)
local tweenInfo = TweenInfo.new(2)
local tween = TweenService:Create(canvasGroup, tweenInfo, {GroupColor3 = targetColor})
tween:Play()Stroke#
Multiple properties control UI borders, depending on the object type.
Alternatively, you can apply a UIStroke child and tween its thickness, color, and/or transparency.
| UI Object | Properties |
|---|---|
UIStroke |
Color, Thickness, Transparency |
local TweenService = game:GetService("TweenService")
local Players = game:GetService("Players")

local PlayerGui = Players.LocalPlayer:WaitForChild("PlayerGui")
local ScreenGui = PlayerGui:WaitForChild("ScreenGui")
local object = ScreenGui:WaitForChild("TextLabel")

local stroke = Instance.new("UIStroke")
stroke.Color = Color3.fromRGB(255, 255, 255)
stroke.Thickness = 5
stroke.Parent = object

local targetColor = Color3.fromRGB(255, 0, 0)
local targetThickness = 10

local tweenInfo = TweenInfo.new(2)
local tween = TweenService:Create(stroke, tweenInfo, {Color = targetColor, Thickness = targetThickness})

tween:Play()
Multi-property tweens#
You can combine any of the single-property tweens into more complex tweens by passing multiple target properties to TweenService:Create(), for example position + rotation or size + transparency.
local TweenService = game:GetService("TweenService")
local Players = game:GetService("Players")

local PlayerGui = Players.LocalPlayer:WaitForChild("PlayerGui")
local ScreenGui = PlayerGui:WaitForChild("ScreenGui")
local object = ScreenGui:WaitForChild("ImageLabel")

object.AnchorPoint = Vector2.new(0.5, 0.5)

local targetPosition = UDim2.new(0.5, 0, 0.5, 0)
local targetRotation = 45

local tweenInfo = TweenInfo.new(2)
local tween = TweenService:Create(object, tweenInfo, {Position = targetPosition, Rotation = targetRotation})

tween:Play()local TweenService = game:GetService("TweenService")
local Players = game:GetService("Players")
local PlayerGui = Players.LocalPlayer:WaitForChild("PlayerGui")
local ScreenGui = PlayerGui:WaitForChild("ScreenGui")
local object = ScreenGui:WaitForChild("ImageLabel")
object.AnchorPoint = Vector2.new(0.5, 0.5)
local aspectRatioConstraint = Instance.new("UIAspectRatioConstraint")
aspectRatioConstraint.Parent = object
local targetSize = UDim2.new(0.4, 0, 0.4, 0)
local targetTransparency = 0.8
local tweenInfo = TweenInfo.new(2)
local tween = TweenService:Create(object, tweenInfo, {Size = targetSize, ImageTransparency = targetTransparency})
tween:Play()Tween sequences#
You can chain UI animations to occur one after another by playing subsequent tweens upon the previous tween's Completed event. For example, the following script moves an object to the center of the screen, then rotates it by 45°.
local TweenService = game:GetService("TweenService")
local Players = game:GetService("Players")

local PlayerGui = Players.LocalPlayer:WaitForChild("PlayerGui")
local ScreenGui = PlayerGui:WaitForChild("ScreenGui")
local object = ScreenGui:WaitForChild("ImageLabel")

object.AnchorPoint = Vector2.new(0.5, 0.5)

local targetPosition = UDim2.new(0.5, 0, 0.5, 0)
local targetRotation = 45

local tweenInfo = TweenInfo.new(2)
local positionTween = TweenService:Create(object, tweenInfo, {Position = targetPosition})
local rotationTween = TweenService:Create(object, tweenInfo, {Rotation = targetRotation})

-- Initially play position tween
positionTween:Play()

-- Play rotation tween upon completion of position tween
positionTween.Completed:Connect(function()
	rotationTween:Play()
end)
Style transitions#
UI objects can also be animated through style transitions, comparable to CSS transitions, where one or more UI properties are tweened through StyleRule definitions. See the Style Editor guide for details.
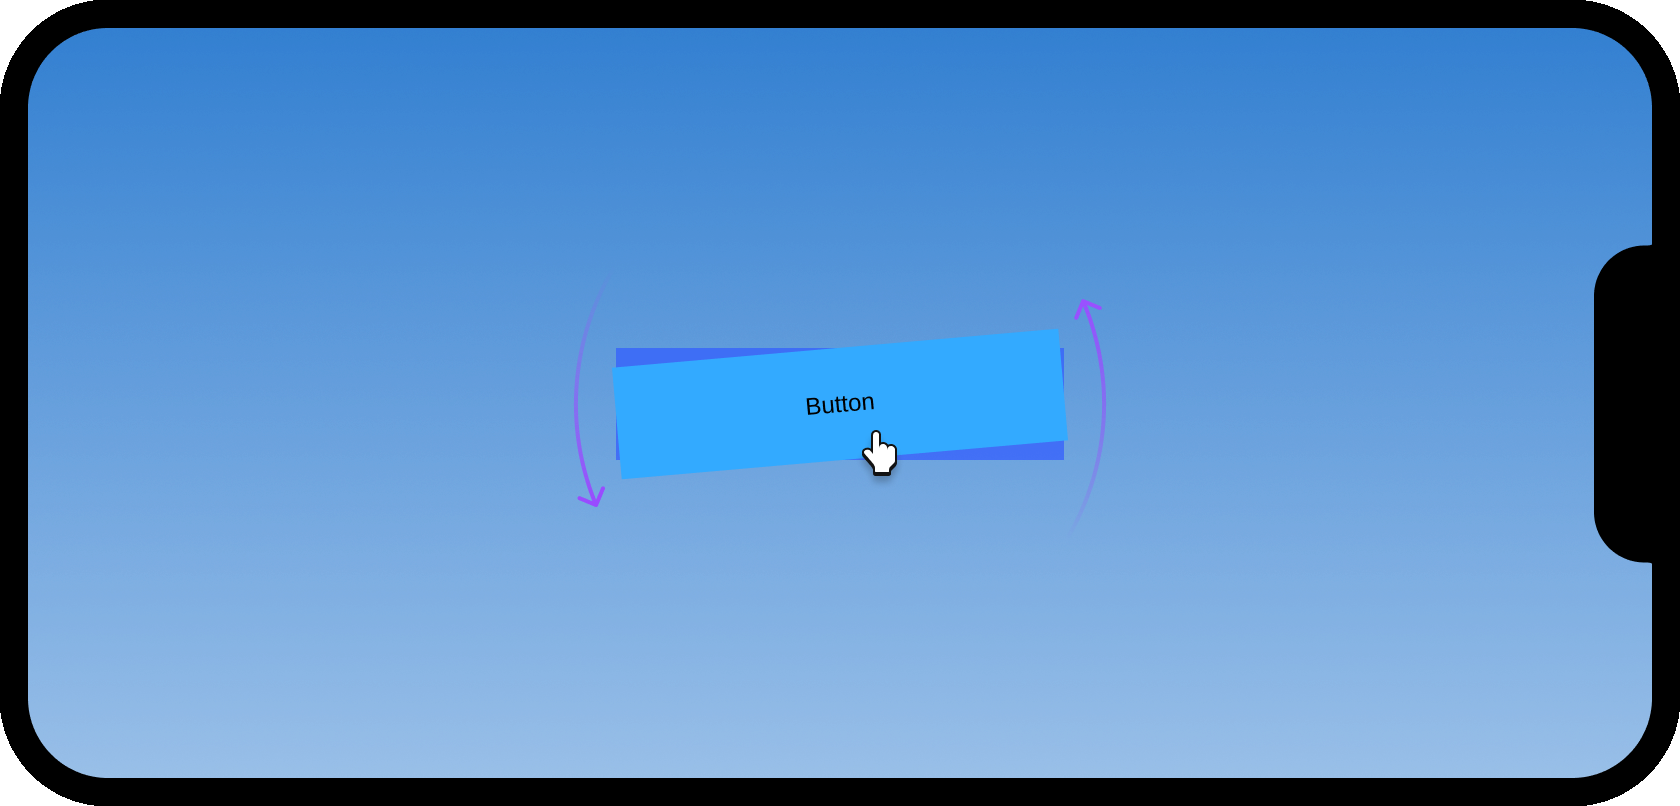
Easing options#
Using the easing options of TweenInfo, you can control the easing style and direction of UI animations.
Style#
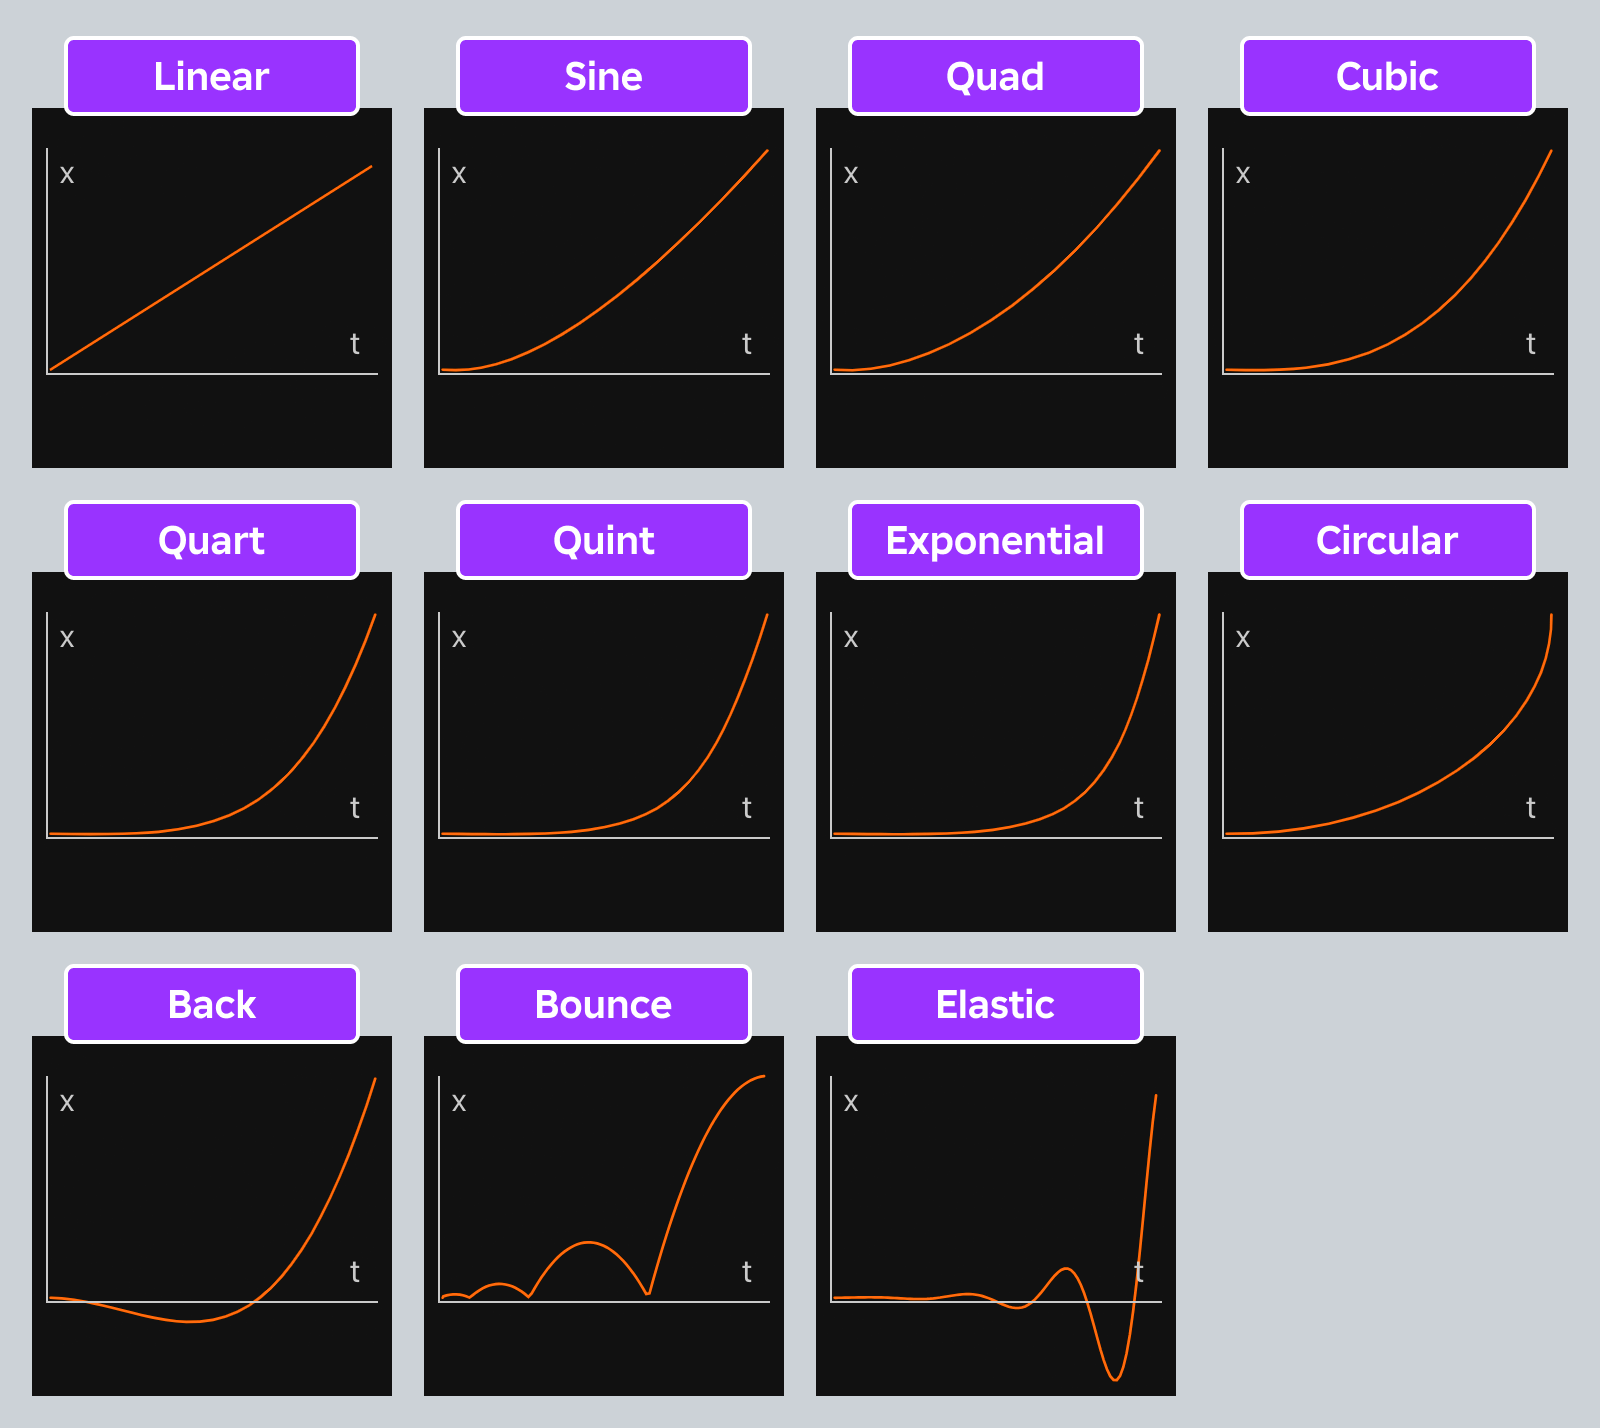
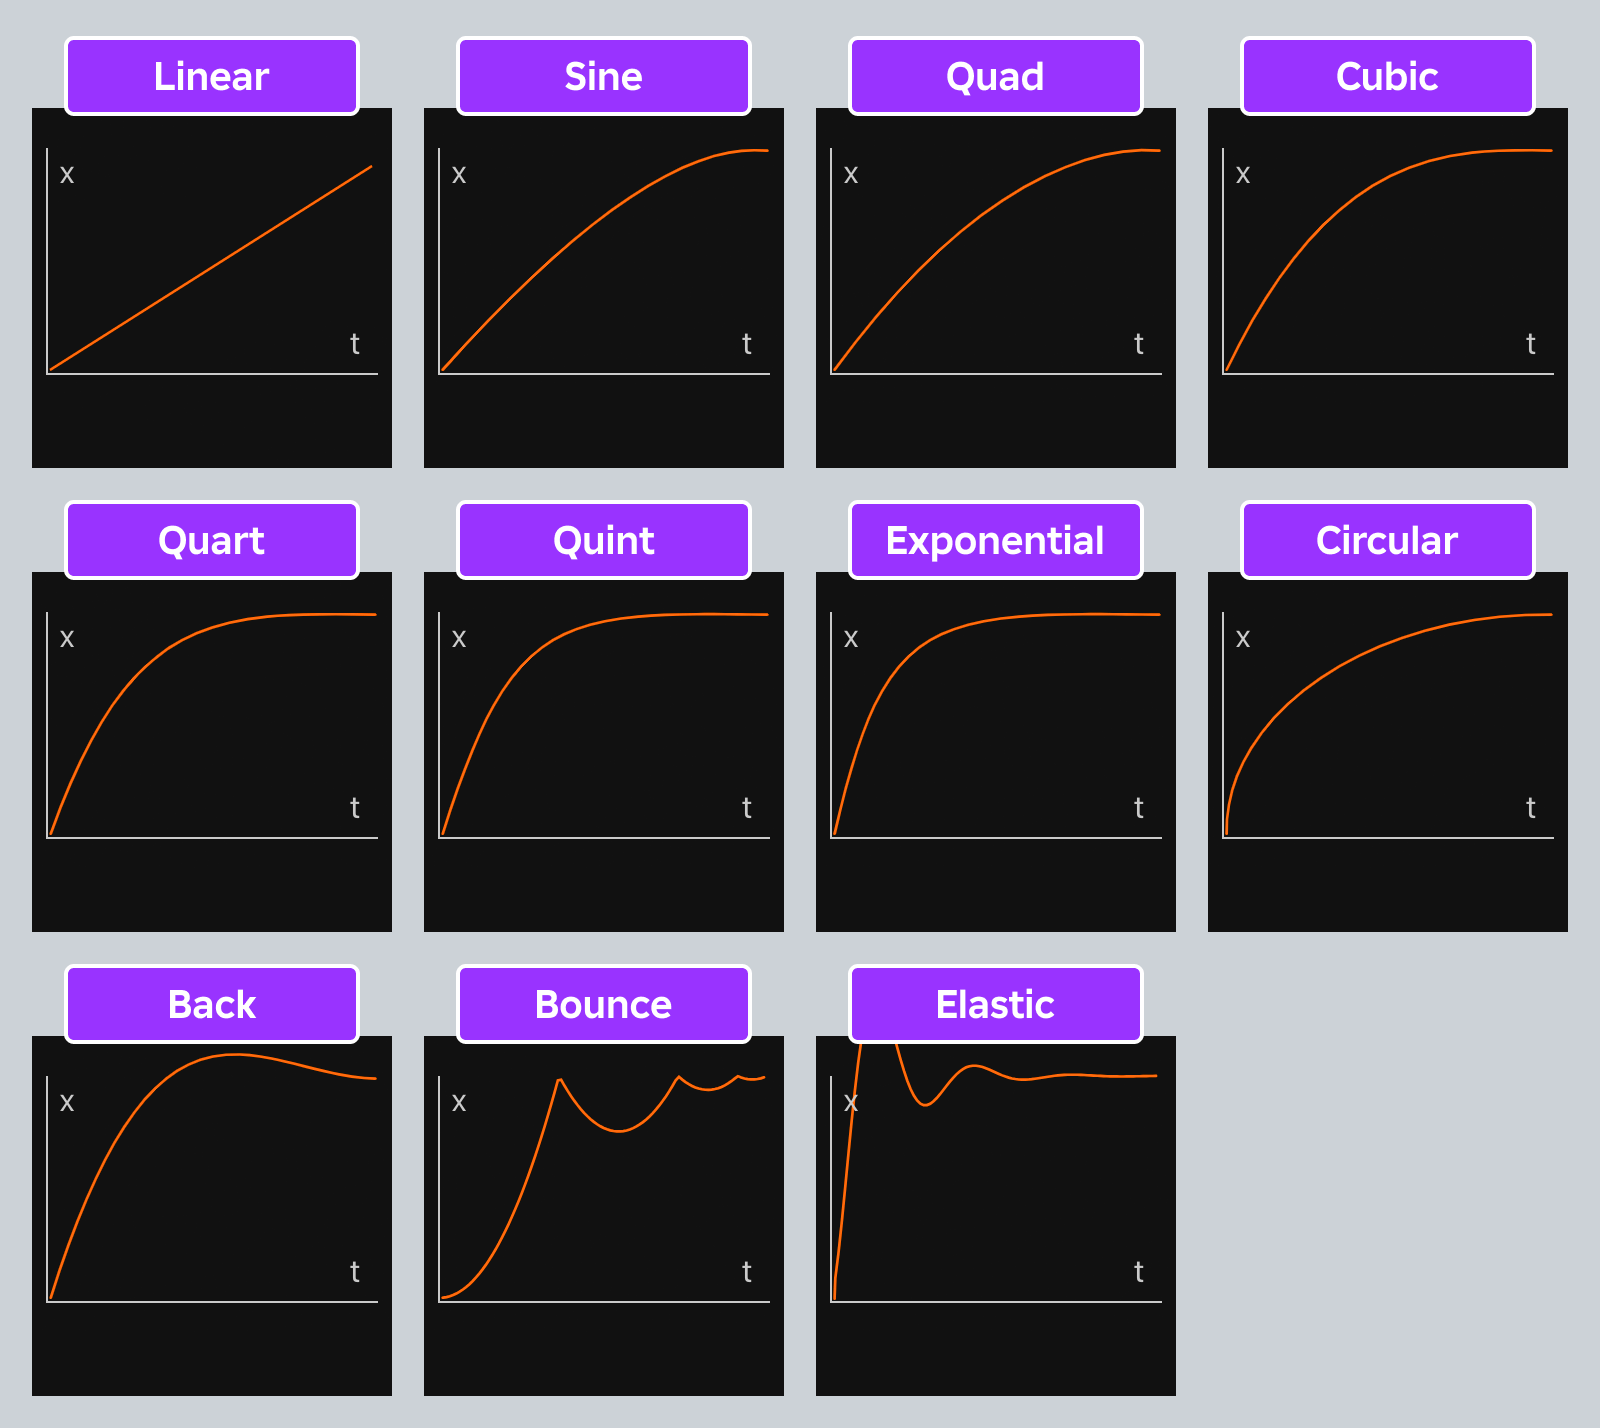
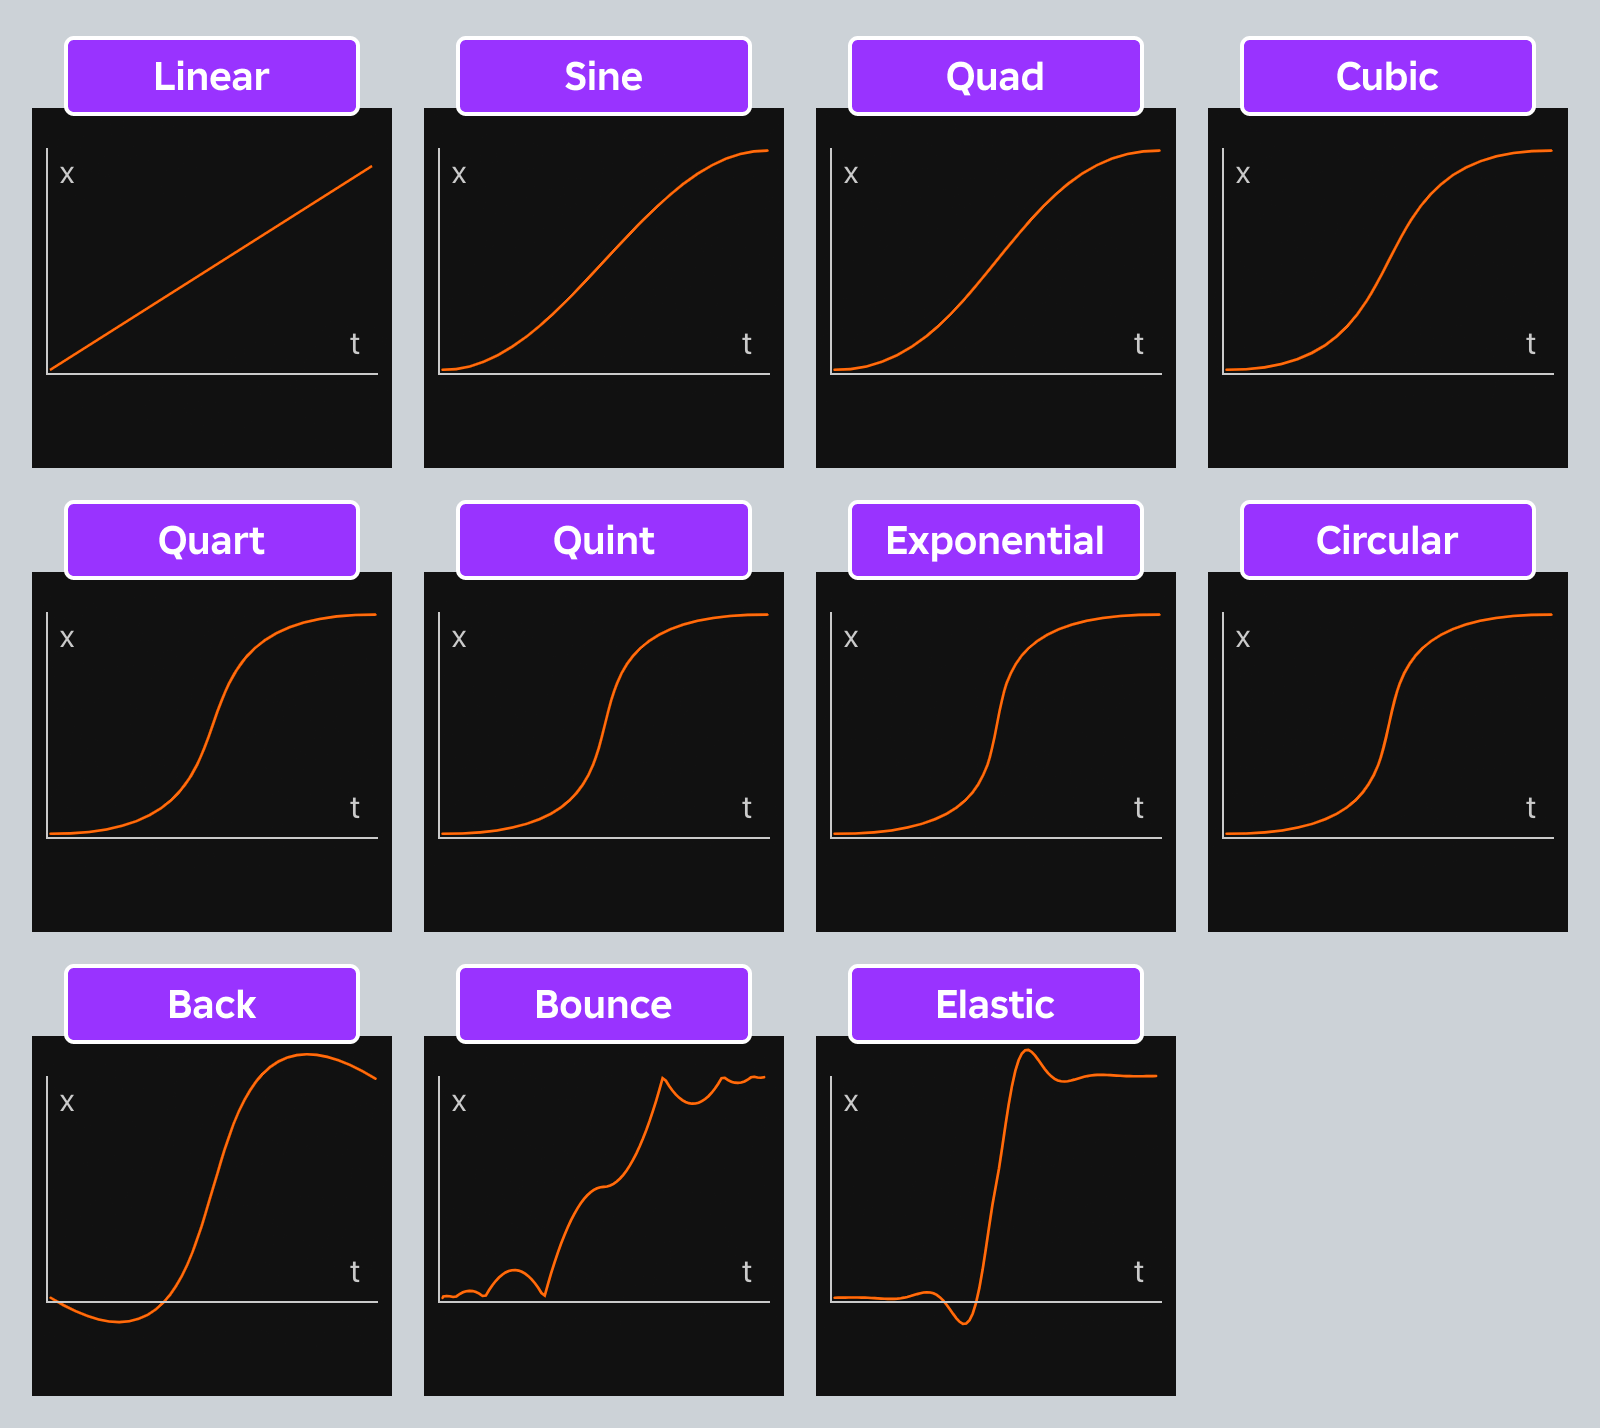
EasingStyle sets the rate of interpolation from start to end. By default, easing style is set to EasingStyle.Quad.
| Style | Description |
|---|---|
| Linear | Moves at a constant speed. |
| Sine | Speed is determined by a sine wave for a gentle easing motion. |
| Quad | Similar to Sine but with a slightly sharper curve based on quadratic interpolation. |
| Cubic | Similar to Quad but with a slightly sharper curve based on cubic interpolation. |
| Quart | Similar to Cubic but with an even sharper curve based on quartic interpolation. |
| Quint | Similar to Quart but with an even sharper curve based on quintic interpolation. |
| Exponential | The sharpest curve based on exponential interpolation. |
| Circular | Follows a circular arc, such that acceleration is more sudden and deceleration more gradual versus Quint or Exponential. |
| Back | Slightly overshoots the target, then backs into place. |
| Bounce | Bounces backwards multiple times after reaching the target, before eventually settling. |
| Elastic | Moves as if attached to a rubber band, overshooting the target several times. |
EasingDirection = In
EasingDirection = Out
EasingDirection = InOut
local tweenInfo = TweenInfo.new(2, Enum.EasingStyle.Cubic)
local tween = TweenService:Create(object, tweenInfo, {Rotation = 45})Direction#
EasingDirection defines how the easing style interpolation applies to an object, with a default of Out. Note that a tween with Linear easing style is not affected, as linear interpolation is constant from start to end.
| Direction | Description |
|---|---|
| In | The easing style applies in a forward direction. |
| Out | The easing style applies in a reverse direction. |
| InOut | The easing style applies forward for the first half and in reverse for the second half. |
local tweenInfo = TweenInfo.new(2, Enum.EasingStyle.Cubic, Enum.EasingDirection.InOut)
local tween = TweenService:Create(object, tweenInfo, {Rotation = 45})
Typewriter effect on text#
You can easily enhance text-based UI, such as cutscene banners, player instructions, and prompts, with animated effects. The "typewriter" effect is ideal for TextLabels that tell a story, output NPC conversations, etc.
Create a new
ModuleScriptwithin ReplicatedStorage.Rename the new script AnimateUI.
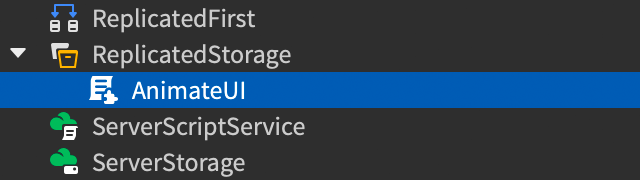
Paste the following code into the script:
local LocalizationService = game:GetService("LocalizationService")
local Players = game:GetService("Players")

local SOURCE_LOCALE = "en"
local translator = nil

local AnimateUI = {}

function AnimateUI.loadTranslator()
    pcall(function()
        translator = LocalizationService:GetTranslatorForPlayerAsync(Players.LocalPlayer)
    end)
    if not translator then
        pcall(function()
            translator = LocalizationService:GetTranslatorForLocaleAsync(SOURCE_LOCALE)
        end)
    end
end

function AnimateUI.typeWrite(guiObject, text, delayBetweenChars)
    guiObject.Visible = true
    guiObject.AutoLocalize = false
    local displayText = text

    -- Translate text if possible
    if translator then
        displayText = translator:Translate(guiObject, text)
    end

    -- Replace line break tags so grapheme loop will not miss those characters
    displayText = displayText:gsub("<br%s*/>", "\n")
     -- Remove RichText tags since char-by-char animation will break the tags
    displayText = displayText:gsub("<[^<>]->", "")

    -- Set translated/modified text on parent
    guiObject.Text = displayText

    local index = 0
    for first, last in utf8.graphemes(displayText) do
        index += 1
        guiObject.MaxVisibleGraphemes = index
        task.wait(delayBetweenChars)
    end
end

return AnimateUI
If your game's source language is not English ("en"), change the locale code for SOURCE_LOCALE to match the source language in localization settings.
Create a
TextLabelin a suitable location, such as within aScreenGuiparented toStarterGui.Insert a new
LocalScriptas a direct child of the label and paste in the following code. Note that each message is output by callingAnimateUI.typeWrite()with parameters for the parent object, the string to output, and the delay between characters.local ReplicatedStorage = game:GetService("ReplicatedStorage") local AnimateUI = require(ReplicatedStorage:WaitForChild("AnimateUI")) local label = script.Parent -- Load translator if game is localized --AnimateUI.loadTranslator() local message1 = [[Beyond this door is the<br /><font size="46" color="rgb(255,50,25)">Great Zorgoth...</font> <font size="40">🗡</font>]] AnimateUI.typeWrite(label, message1, 0.05) task.wait(1) local message2 = [[...who rules this dungeon <font color="rgb(255,200,50)">unchallenged!</font> <font size="30">😈</font>]] AnimateUI.typeWrite(label, message2, 0.05)